<!DOCTYPE html>
<html>
<head>
<meta charset="utf-8">
<meta name="viewport" content="initial-scale=1,maximum-scale=1,user-scalable=no">
<title>Create a custom widget - 4.4</title>
<style>
.esri-hello-world {
font-family: "Helvetica Neue", sans-serif;
display: inline-block;
}
.esri-hello-world--emphasis {
font-weight: bold;
}
</style>
<script>
var locationPath = location.pathname.replace(/\/[^\/]+$/, "");
window.dojoConfig = {
packages: [
{
name: "app",
location: locationPath + "/app"
}
]
};
</script>
<script src="https://js.arcgis.com/4.4/"></script>
<script>
var widget;
require([
"app/HelloWorld",
"dojo/domReady!"
], function(
HelloWorld
) {
var names = [
{
firstName: "John",
lastName: "Smith"
},
{
firstName: "Jackie",
lastName: "Miller"
},
{
firstName: "Anna",
lastName: "Price"
}],
nameIndex = 0;
var widget = new HelloWorld({
firstName: names[nameIndex].firstName,
lastName: names[nameIndex].lastName,
container: "widgetDiv"
});
function changeName() {
widget.set(names[++nameIndex % names.length]);
}
widget.on("greeted", function(e) {
console.log(e);
})
setInterval(changeName, 1000);
});
</script>
</head>
<body>
<div id="widgetDiv"></div>
</body>
</html>Create a custom widget
Working with widgets is an essential part of the ArcGIS API for JavaScript. Typically, a widget is thought of as a piece of the API that encapsulates a specific set of functionality. The API provides ready-to-use widgets with predefined functionality. There may be circumstances where you may need to customize a widget to your own specifications. In these cases, a custom widget may be what is needed. The following steps go through creating a very basic "Hello World" widget. These steps are provided as a basic foundation needed when creating your own custom widget. For a more detailed example, please refer to the Recenter widget sample.
Before you get started
Widget development is written in TypeScript and compiled to JavaScript. In order to follow the steps below, you will need to make certain you have TypeScript installed. Any text editor should suffice as long as you are able to compile the resulting TypeScript code into a resulting JavaScript file. In addition to this, you should also be familiar with JSX. This allows you to define the widget's UI similarly to HTML. Lastly, widget development is largely reliant upon familiarity of Implementing Accessor. More information on these requirements can be found at:
Tutorial steps
- Create project directory and file structure
- Install the ArcGIS JavaScript API 4.x Type Definitions
- Implement HelloWorld widget
- Compiling the TSX file
- Add the widget to the application
- Source code
- Additional information
1. Create project directory and file structure
There is no 'one-specific' IDE required for writing TypeScript. As long as you have access to the compiler needed to generate the underlying JavaScript files, any IDE should work.
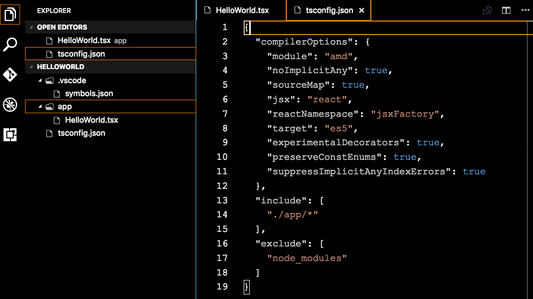
Create a new directory to contain all the widget files. In the screen capture below, Visual Studio Code is used. This is a free download and works well with TypeScript. A new folder called HelloWorld is created. This folder should also be accessible by a web server.
Inside the HelloWorld directory, create another directory called app, this will only contain the widget's files. Inside the app directory, create a new file called HelloWorld.tsx.
Each widget belongs in a .tsx file, which allows you to use JSX to define the UI.
- In the HelloWorld directory, create a
tsconfig.jsonfile. This file is necessary to tell the compiler how the project should be compiled.
In the tsconfig.json file, add the following snippet:
{
  "compilerOptions": {
    "module": "amd",
    "noImplicitAny": true,
    "sourceMap": true,
    "jsx": "react",
    "jsxFactory": "tsx",
    "target": "es5",
    "experimentalDecorators": true,
    "preserveConstEnums": true,
    "suppressImplicitAnyIndexErrors": true
  },
  "include": [
    "./app/*"
  ],
  "exclude": [
    "node_modules"
  ]
}
The tsconfig.json file specifies the root files and the compiler options required to compile the project.
Please refer to the tsconfig.json documentation for additional information specific to the include and exclude options.
Also, the .vscode folder is created by Visual Studio Code and is not specific for this application.
2. Install the ArcGIS JavaScript API 4.x Type Definitions
For a detailed discussion on setting up TypeScript within your environment, please refer to the TypeScript Setup guide topic.
In order to work with the ArcGIS JS API typings, you will need to install them via a simple command line command.
- Open up a command prompt and browse to the HelloWorld directory.
- Type the following into the command line
npm init --yes
npm install --save @types/arcgis-js-api
The syntax above can also be referenced with explanation at TypesScript Setup - Install the ArcGIS API for JavaScript Typings. These typings can be directly accessed at the JSAPI-resources GitHub repo.
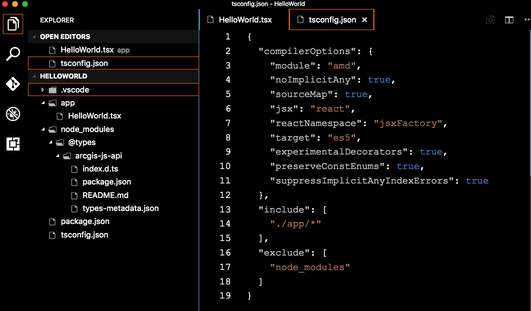
What you should now see is a package.json file in the root of the project directory in addition to a new node_modules directory that contains all of these ArcGIS JS API typings.
3. Implement HelloWorld widget
Now you're ready to actually implement the custom widget.
Add dependency paths and import statements
Open HelloWorld.tsx and add the following lines of code.
/// <amd-dependency path="esri/core/tsSupport/declareExtendsHelper" name="__extends" />
/// <amd-dependency path="esri/core/tsSupport/decorateHelper" name="__decorate" />

import {subclass, declared, property} from "esri/core/accessorSupport/decorators";

import Widget = require("esri/widgets/Widget");

import { renderable, tsx } from "esri/widgets/support/widget";

const CSS = {
  base: "esri-hello-world",
  emphasis: "esri-hello-world--emphasis"
};
The first two lines refer to triple slash directives used in TypeScript. These import directives are still needed as our TypeScript library relies on some functionality within them. The
__extendsand__decoratenames are helpers when extending a class or decorating members of a class.The next three lines are importing specific modules used for the widget implementation.
Lastly, we set a
CSSobject withbaseandemphasisproperties. These are used within the widget's render() method and is used as a lookup for classes, thereby centralizing all the CSS within the widget.
Extend Widget base class
Now in the HelloWorld.tsx file, add the following lines of code.
@subclass("esri.widgets.HelloWorld")
class HelloWorld extends declared(Widget) {

}
Here, we are extending the Widget base class. The @subclass decorator is used in conjunction with declared and is necessary as they are both key components needed for constructing subclasses off of a given base class.
Add widget properties
Within this class implementation, add these properties:
class HelloWorld extends declared(Widget) {

  //----------------------------------
  //  firstName
  //----------------------------------

  @property()
  @renderable()
  firstName: string = "John";

  //----------------------------------
  //  lastName
  //----------------------------------

  @property()
  @renderable()
  lastName: string = "Smith";

  //----------------------------------
  //  emphasized
  //----------------------------------

  @property()
  @renderable()
  emphasized: boolean = false;

}
All of these properties have @property and @renderable decorators. The first one is used to define an Accessor property. By specifying this decorator within the property, you give this property the same behavior as other properties within the API. By specifying @renderable you are telling the widget to schedule a renderer whenever the property is modified.
Add widget methods
Now, you will add both a public and private method to the widget.
// Public method
render() {
  const greeting = this._getGreeting();
  const classes = {
    [CSS.emphasis]: this.emphasized
  };

  return (
    <div bind={this}
         class={CSS.base}
         classes={classes}>
    {greeting}
    </div>
  );
}

// Private method
private _getGreeting(): string {
  return `Hello, my name is ${this.firstName} ${this.lastName}!`;
}
The render() method is the only required member of the API that must be implemented. This method must return a valid UI representation. JSX is used to define the UI. With this said, it is important to note that we are not using React. The transpiled JSX is processed using a custom JSX factory, therefore there is no direct equivalency between implementing a custom widget and a React component.
The snippet above sets two variables called greeting and classes. By default, functions referenced in your elements will have this set to the actual element. You can use the special bind attribute to change this, e.g. bind={this}.
The class property cannot be changed within the render() method. If there are dynamic classes, use the special classes attribute instead.
For example,
render() {
  const baseClass = this.isBold && this.isItalic ? `${CSS.base} ${CSS.bold} ${CSS.italic}` :
                 this.isBold ? `${CSS.base} ${CSS.bold}` :
                 this.isItalic ? `${CSS.base} ${CSS.italic}` :
                 CSS.base;
  return (
    <div class={baseClass}>Hello World!</div>
  );
}
will throw a runtime error because class cannot be changed. Instead use,
render() {
  const dynamicClasses = {
    [CSS.bold]: this.isBold,
    [CSS.italic]: this.isItalic
  };
  return (
    <div class={CSS.base} classes={dynamicClasses}>Hello World!</div>
  );
}
Lastly, the greeting messages returns Hello, my name is ${this.firstName} ${this.lastName}!
Export widget
At the very end of the code page, add a line to export the object into an easily- consumable external module.
export = HelloWorld;
For the full code sample, please refer to the Source code.
4. Compiling the TSX file
Now that the widget's code is implemented, compile the .tsx file to its underlying JavaScript implementation.
In the command prompt, browse to the location of the HelloWorld directory and type tsc. This command will look at your tsconfig.json file and compile the TypeScript based on its configuration.
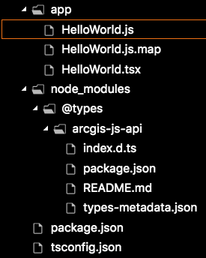
You should now have a new HelloWorld.js file generated in the same directory as its .tsx file, in addition to a HelloWorld.js.map sourcemap file.
The sourcemap is provided if needed. For this particular example, it really isn't necessary but we show how you can create one as it may be useful in certain circumstances.
5. Add the widget to the application
Now that you generated the underlying .js file for the widget, it can be added into your JavaScript application. In the same HelloWorld directory, create an index.html file.
For the complete index.html file, please refer to the Source code.
Add CSS
The widget references .esri-hello-world and .esri-hello-world-emphasis classes. Add a style element that references these classes similar as seen below.
<style>
  .esri-hello-world {
    font-family: "Helvetica Neue", sans-serif;
    display: inline-block;
  }
  .esri-hello-world--emphasis {
    font-weight: bold;
  }
</style>
Add the custom widget reference
Once you've created the custom widget, you need to load it. This comes down to telling Dojo's module loader how to resolve the path for your widget which means mapping a module identifier to a file on your web server. On the SitePen blog, there's a post discussing the differences between aliases, paths and packages which may help alleviate any questions specific to this.
Add a script element that handles loading this custom widget as seen below.
<script>
var locationPath = location.pathname.replace(/\/[^\/]+$/, "");
window.dojoConfig = {
  packages: [
    {
      name: "app",
      location: locationPath + "/app"
    }
  ]
};
</script>
Reference and use the custom widget
Now that Dojo knows where to find modules in the app folder, require can be used to load it along with other modules used by the application.
Here's a require block that loads the app/HelloWorld module as well as another Dojo module.
require([
  "app/HelloWorld",
  "dojo/domReady!"],

  function(HelloWorld) { }
Next, we'll create an array of names which will be used to cycle through and display in the widget's greeting.
var names = [
  { firstName: "John", lastName: "Smith" },
  { firstName: "Jackie", lastName: "Miller" },
  { firstName: "Anna", lastName: "Price" }
],

nameIndex = 0;
We'll now instantiate the widget using the following syntax.
var widget = new HelloWorld({
  firstName: names[nameIndex].firstName,
  lastName: names[nameIndex].lastName,
  container: "widgetDiv"
});
Lastly, we'll create a function to cycle through the names.
function changeName() {
  widget.set(names[++nameIndex % names.length]);
}

setInterval(changeName, 1000);
Source code
Put it all together
Your finished tutorial should look similar to the files below.
/// <amd-dependency path="esri/core/tsSupport/declareExtendsHelper" name="__extends" />
/// <amd-dependency path="esri/core/tsSupport/decorateHelper" name="__decorate" />

import {subclass, declared, property} from "esri/core/accessorSupport/decorators";

import Widget = require("esri/widgets/Widget");

import { renderable, tsx } from "esri/widgets/support/widget";

const CSS = {
  base: "esri-hello-world",
  emphasis: "esri-hello-world--emphasis"
};

@subclass("esri.widgets.HelloWorld")
class HelloWorld extends declared(Widget) {

  //--------------------------------------------------------------------------
  //
  //  Properties
  //
  //--------------------------------------------------------------------------

  //----------------------------------
  //  firstName
  //----------------------------------

  @property()
  @renderable()
  firstName: string = "John";

  //----------------------------------
  //  lastName
  //----------------------------------

  @property()
  @renderable()
  lastName: string = "Smith";

  //----------------------------------
  //  emphasized
  //----------------------------------

  @property()
  @renderable()
  emphasized: boolean = false;

  //--------------------------------------------------------------------------
  //
  //  Public Methods
  //
  //--------------------------------------------------------------------------


  render() {
    const greeting = this._getGreeting();
    const classes = {
      [CSS.emphasis]: this.emphasized
    };

    return (
      <div bind={this}
           class={CSS.base}
           classes={classes}>
      {greeting}
      </div>
    );
  }

  //--------------------------------------------------------------------------
  //
  //  Private Methods
  //
  //--------------------------------------------------------------------------

  private _getGreeting(): string {
    return `Hello, my name is ${this.firstName} ${this.lastName}!`;
  }

}

export = HelloWorld;
/// <amd-dependency path="esri/core/tsSupport/declareExtendsHelper" name="__extends" />
/// <amd-dependency path="esri/core/tsSupport/decorateHelper" name="__decorate" />
var __extends = (this && this.__extends) || (function () {
    var extendStatics = Object.setPrototypeOf ||
        ({ __proto__: [] } instanceof Array && function (d, b) { d.__proto__ = b; }) ||
        function (d, b) { for (var p in b) if (b.hasOwnProperty(p)) d[p] = b[p]; };
    return function (d, b) {
        extendStatics(d, b);
        function __() { this.constructor = d; }
        d.prototype = b === null ? Object.create(b) : (__.prototype = b.prototype, new __());
    };
})();
var __decorate = (this && this.__decorate) || function (decorators, target, key, desc) {
    var c = arguments.length, r = c < 3 ? target : desc === null ? desc = Object.getOwnPropertyDescriptor(target, key) : desc, d;
    if (typeof Reflect === "object" && typeof Reflect.decorate === "function") r = Reflect.decorate(decorators, target, key, desc);
    else for (var i = decorators.length - 1; i >= 0; i--) if (d = decorators[i]) r = (c < 3 ? d(r) : c > 3 ? d(target, key, r) : d(target, key)) || r;
    return c > 3 && r && Object.defineProperty(target, key, r), r;
};
define(["require", "exports", "esri/core/tsSupport/declareExtendsHelper", "esri/core/tsSupport/decorateHelper", "esri/core/accessorSupport/decorators", "esri/widgets/Widget", "esri/widgets/support/widget"], function (require, exports, __extends, __decorate, decorators_1, Widget, widget_1) {

    "use strict";
    var CSS = {
        base: "esri-hello-world",
        emphasis: "esri-hello-world--emphasis"
    };
    var HelloWorld = (function (_super) {
        __extends(HelloWorld, _super);
        function HelloWorld() {
            //--------------------------------------------------------------------------
            //
            //  Properties
            //
            //--------------------------------------------------------------------------
            var _this = _super !== null && _super.apply(this, arguments) || this;
            //----------------------------------
            //  firstName
            //----------------------------------
            _this.firstName = "John";
            //----------------------------------
            //  lastName
            //----------------------------------
            _this.lastName = "Smith";
            //----------------------------------
            //  emphasized
            //----------------------------------
            _this.emphasized = false;
            return _this;
        }
        //--------------------------------------------------------------------------
        //
        //  Public Methods
        //
        //--------------------------------------------------------------------------
        HelloWorld.prototype.render = function () {
            var greeting = this._getGreeting();
            var classes = (_a = {},
                _a[CSS.emphasis] = this.emphasized,
                _a);
            return (widget_1.tsx("div", { bind: this, class: CSS.base, classes: classes }, greeting));
            var _a;
        };
        //--------------------------------------------------------------------------
        //
        //  Private Methods
        //
        //--------------------------------------------------------------------------
        HelloWorld.prototype._getGreeting = function () {
            return "Hello, my name is " + this.firstName + " " + this.lastName + "!";
        };
        return HelloWorld;
    }(decorators_1.declared(Widget)));
    __decorate([
        decorators_1.property(),
        widget_1.renderable()
    ], HelloWorld.prototype, "firstName", void 0);
    __decorate([
        decorators_1.property(),
        widget_1.renderable()
    ], HelloWorld.prototype, "lastName", void 0);
    __decorate([
        decorators_1.property(),
        widget_1.renderable()
    ], HelloWorld.prototype, "emphasized", void 0);
    HelloWorld = __decorate([
        decorators_1.subclass("esri.widgets.HelloWorld")
    ], HelloWorld);
    return HelloWorld;
});
//# sourceMappingURL=HelloWorld.js.map
Additional information
The files used in this example can be accessed from the source code above. Please use these files as a starting point to begin creating your own custom classes and widgets. Once you have this complete and would like to see a more advanced custom widget, please continue to the Custom recenter widget sample.
- TypeScript Setup
- Accessor class
- Implementing Accessor
- Styling
- TypeScript reference
- JSX reference
- Migrating from 3.x to 4.4
Sample search results
| Title | Sample |
|---|
There were no match results from your search criteria.